Category Archives: Dessert

Vegan Chocolate Covered Peanut Butter Balls

peanut butter balls

I love peanut butter… I could exist on peanut butter alone… I eat a jar a week (sometimes more, let’s be real).

peanut butter

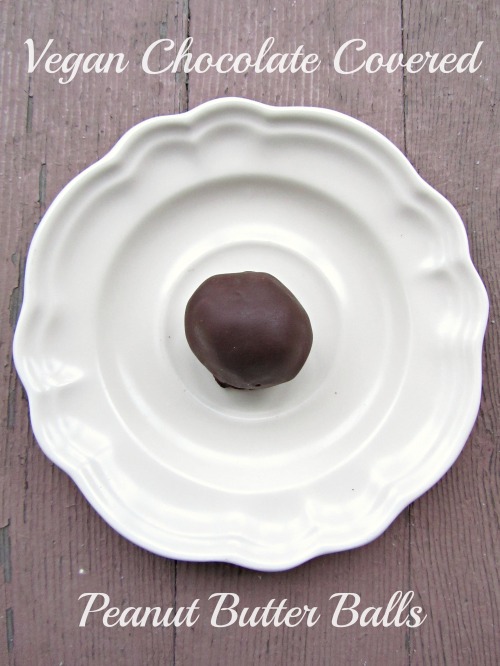
Around the holidays every year, I love to make chocolate covered peanut butter balls. I posted the secret family recipe last year. However, they contain a fair amount of butter and milk chocolate… so I revamped it and made it vegan! I gave some to Mark and my coworkers… (they didn’t even know they were vegan… win.)

ready for dipping

Vegan Chocolate Covered Peanut Butter Balls

makes 28-30 balls

1/2 cup of Earth Balance buttery spread, or other vegan butter
8 oz or about 2 cups of powdered sugar
1 cups of graham cracker crumbs (gf if need be, Nabisco Original Graham Crackers are Vegan)
6 oz of chunky peanut butter (scant 3/4 cup)
vegan chocolate chips (I used a little less than one 9 oz bag of Sunspire Bittersweet)
1/4 block of paraffin wax (in baking aisle, fret not it’s fine to eat, in small quantities) 

chocolate

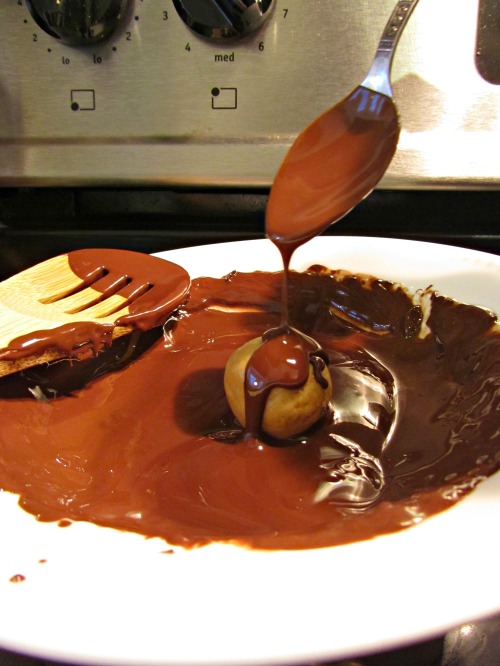
Mix the first 3 ingredients together then add in the graham crackers and peanut butter and mix until combined completely. Form into 1 inch balls with your hands. Line a cookie sheet with wax paper. Take a small sauce pot and fill it with an inch or 2 of water. Bring water to a gentle simmer, not boiling. In a microwave-safe, heat proof bowl, microwave the wax so it melts, add in the chocolate chips. Place the bowl over the simmering pot of water, it should rest on the rim of the pot without touching the water below, otherwise you’ll scald the chocolate. The steam form the water will melt the chocolate without scalding it. Stir the chocolate until it is smooth and melted. Dip each ball in the chocolate, coating it evenly, remove it with a slotted spoon to let the excess chocolate drip off. Place the coated peanut butter ball on the waxed paper. Once all the balls are covered, place in fridge for a couple of hours so the chocolate coating can harden.

waiting for them to dry... so I can eat them

Leave a comment

Filed under Dessert

Vegan and Gluten Free Pumpkin Pie

I celebrated Thanksgiving with Mark’s family this year. With only 6 of us at the table, it was a little more subdued than my family’s usual 20 person feast. Not that a small Thanksgiving is a bad thing. We watched a lot of football, played soccer with Reggie, Mark’s Family’s dog, and I went for a nice 5.5 mile run outside. Sadly, I had to work on Black Friday, but unlike everywhere else open, work was painfully slow.

This was also the first year I had a lactose-free meal… it was a little hard to accept that my 22nd Thanksgiving would not include butter, cheese or cream. What is Thanksgiving without those things?

It actually ended up being pretty dang good… I ate a ton of Brussels sprouts, cornbread stuffing made with veggie stock and acorn squash roasted in maple syrup. AND vegan pumpkin pie with gluten free crust! (Mark’s dad is gluten free).

The condensed milk was swapped with coconut milk and thickened with agar agar instead of eggs. Agar agar is basically ground up red algae and when heated and mixed with water it becomes a gelatinous substance. Oh the wonders of biology. I picked up some agar agar and the other necessary ingredients (vegetable shortening and tapioca flour) at the local coop, in bulk.

I also picked up King Arthur’s new gluten free multi-purpose flour… It was the best gluten free flour I’ve worked with and I was supporting local! As an added bonus, it doesn’t contain xanthan gum like some other gf flours… xanthan gum can cause upset stomachs in some people.

Source

The crust was kind of labor intensive, there are many crucial steps and some tips that I picked up from Simply Gluten Free.

  • make sure everything is cold… put ice in your water and put shortening in the freezer for 30 minutes before using it
  • use a food processor to incorporate the shortening.. it will make the crust flakier
  • skimp on the water… the dough should only stick together when pressed with your fingers
  • let the dough rest for 1/2 an hour before rolling… it lets the moisture distribute evenly
  • don’t try to roll the dough out…. extrude it by placing it between two floured sheets of wax paper.
  • use the highest quality ingredients you can afford… it really does make a difference, especially the flour

Since gluten-free baking is a tricky beast, I didn’t really stray from the original recipe. The dough had the consistency of shortbread cookie dough, and was pretty prone to cracking which can be frustrating to a perfectionist like me. I think next time I’d just buy a pre-made gluten free crust, but it was defiantly worth the experience. Plus, I wanted to use my festive little leaf cookie cutters before fall ends.

For the Crust,  from Simply Gluten Free

1/2 cup of organic vegetable shortening (I used spectrum brand)
2-4 tablespoons of water (I used 3)
1 1/4 cups of gluten free multi-purpose flour, such as King Arthur
1/2 teaspoon of salt
2 tablespoons of granulated sugar

Follow the tips and directions here, a lot of the steps are crucial so follow it closely… it’s also a long process. Don’t start it at 9 pm like I did.

For the Pie, from the Blender, a William Sonoma Blog

1 15oz can of pumpkin puree
1/2 cup of maple syrup (look for kosher label to ensure its vegan, if need be)
1 can of coconut milk (14oz)
2 tablespoons of tapioca flour (found in bulk section)
2 teaspoons of pumpkin pie spice
1/2 teaspoon of salt
splash of vanilla extract
3/4 cup of water
2 teaspoon of agar agar powder, (not flakes or bars, found in bulk section)
 

Blend together the pumpkin, maple syrup, coconut milk, tapioca flour, pumpkin pie spice, salt and vanilla extract, in a large bowl and set aside.

In a sauce pot bring the 3/4 cup of water and agar agar to a boil, stirring constantly. Let simmer for 1 to 2 minutes then stir in the pumpkin mixture and return to a boil. Let thicken for 2 to 3 more minutes, stirring it constantly.

Pour the mixture into the prebaked pie shell. Refrigerate for 3 to 5 hours, until set and firm. Serve chilled or at room temp.

1 Comment

Filed under Dessert

Apple Streusel Cake

Sunday, after some grocery shopping, a five mile run, an ab workout and some cleaning, I spent the afternoon in the kitchen. The analytical side of my brain loves baking, it’s like an experiment. Baking is really the only time that I follow a recipe, it’s all about proportions, and if you mess those up you can end up with a disaster.  Sometimes I get an idea in my head and can’t find an already existing recipe in my cookbooks or on the internet. If I can find a solid recipe to use as a jumping off point, then the wheels start churning in my brain, swap this for that, change this, increase that, and voila!

Since we have 7 lbs of apples that we picked, I wanted to make a vegan apple cake, loaded with apples and a streusel topping, I wanted a layer of apples to cover the entire top, like an apple upside-down cake, but I also wanted apples in the batter, and I wanted a cinnamony-sugary-crumbly topping. I wanted it to be whole wheat, flavorful and moist and trick people into thinking it had sour cream or egg yolks or something like that in it. Maybe I’m crazy.

Maybe I shouldn’t have cleaned before I baked, I made a mess and had to re-clean the floor and counter. But it was worth the extra cleaning, this cake is awesome. It was what I had in my head… The analytical side of my brain is very pleased with itself.

I also made butternut squash soup, and roasted the squash while the cake baked away in the oven… conserving energy! Ahh, the return of Soup Sundays!

Apple Streusel Cake

Streusel:
1/4 cup whole wheat flour
1/4 cup of corn meal
1/2 cup brown sugar
1/2 cup vegan butter, softened, such as earth balance
1/2 cup of oats
2 tablespoons vegan vanilla yogurt, such as Whole Soy Co Vanilla Yogurt
1 teaspoon cinnamon
1/2 teaspoon pumpkin pie spice
 
Cake:
1/2 cup vegan butter, melted
3/4 cup sugar
1/4 cup unsweetened applesauce
1/4 cup vegan vanilla yogurt
1 teaspoon vanilla extract
1 cups whole wheat flour
1/4 cup of corn meal
1/2 teaspoon baking soda
1/2 teaspoon baking powder
1/2 tablespoon apple cider vinegar
3 apples peeled and cored. 1 diced and 2 sliced thinly
 

Preheat the oven to 350. Grease a 9X9 or 8X12 pan and lightly dust with flour. In a small bowl, combine all the streusel ingredients and set aside.

For the cake: In a large bowl, combine the butter, sugar, applesauce, yogurt and vanilla extract with a wooden spoon. Then add in the flour, corn meal, baking soda, baking powder and vinegar, stir to combine.

Peel and core the apples. Dice one up and leave the other 2 in ¼ inch slices. Stir the diced apple into the cake batter. Spread the batter evenly into the prepared pan. Place the apple slices in a single layer over the batter, overlapping the slices slightly. Dot the streusel over the top of the apple layer, allowing the apple layer to peak through. Place in the oven and bake for 45-55 minutes or until a toothpick inserted in the center comes out clean.

end photo montage… cake flavors marry together the longer they sit, so it tastes better the next day, warmed back up in the oven or microwave.
 

2 Comments

Filed under Dessert

Coconut Pumpkin Bars

Mark had a business trip this week, which meant I was on my own for 2 nights… I’ve never really lived alone, so the idea of being home alone at night still kinda creeps me out. But, I had to put on my big girl pants and be brave. After all, we are adults now, with full time jobs, and business trips, and bills, and all that real life stuff. It was weird to cook for just myself… one night I just ate roasted Brussels sprouts (with dried cranberries, a mustard glaze, and a balsamic reduction). Luckily, Mark’s next business trip isn’t until January.

Today, I rode my bike (15 miles round trip) to the farmers market with $13 in my pocket. I got quite the haul and I have big plans for dinner this coming week.

I confessed my pumpkin re-obsession last post and promised these coconut pumpkin bars… so here they are… they disappeared quickly, most were shoved secretly into our mouths, over the sink, when we though the other wasn’t looking.  Some were enjoyed on a plate with a cup of coffee. Luckily, each slice has only 128 calories and is vegan.

Coconut Pumpkin Bars

1 1/2 cups of whole wheat flour

1/2 teaspoon of pumpkin pie spices

1/2 teaspoon of cinnamon

1 teaspoon of baking soda

1 cup of shredded coconut

1 cup of pumpkin pure

3/4 cup of sugar

1 teaspoon of apple cider vinegar

1/4 cup of oil

1/3 cup of water

Preheat the oven to 350. Grease a 8×8 inch pan, and line it with parchment paper, for easy removal. In a small bowl, combine the flour, spices, baking soda and coconut. In a medium sized bowl, cream together pumpkin, sugar, vinegar, oil and water. Then add the dry ingredients and stir with a wooden spoon until just combined. Pour the mixture into the prepared pan and smooth it out. Bake for 25-35 minutes or until a toothpick inserted in the center comes out clean. Cool in the pan on a wire rack for 15 minutes, remove from the pan and cool completely on the wire rack. Slice into 16 slices and enjoy with coffee or as a snack.

1 Comment

Filed under Breakfast, Dessert, Snacks

Chocolate Zucchini Muffins

I hope everyone had a restful 3 day weekend. Mark and I turned our weekend into a 4 day weekend and headed up to the infamous “red camp” in the north woods of Maine. Red Camp is Mark’s family’s lakeside cabin. We hung out with a few friends from college and Mark’s parents.

(source: Mark’s Dad)

We hiked, kayaked and lounged on the deck while drinking beers… sounds like a good weekend to me. Our big hike was up Little Spencer Mountain, and don’t let its name fool you…even though it’s 3,040 ft tall… the climb up was mostly scrambling up boulders and even up a 25 ft chimney (crevice). According to many Moosehead Lake Region Hiking Guides, it is one of the most difficult hikes in the region. The scrapes and bruises from the overgrown, steep trail were worth it for amazing views from the top… you can see the entire Moosehead Lake Region.

It was really hard to leave on Monday. I mean with views like this… who would want to.

Blue Moon Rising over Katadin

Katadin by day

There are certain foods that are camp foods… they need to survive the hour trip down logging roads, be cooked over an open fire and of course be delicious. At this point in the late summer, zucchinis are still coming out the wazoo and you might be sick of making loafs and loafs of zucchini bread. These chocolate zucchini muffins contain a whole zucchini but you can hardly tell. These flavorful muffins taste more like a brownie than a healthy zucchini and banana laden muffin, and did I mention that they are vegan and only have 100 calories each. These muffins are the perfect car snack for that long drive and defiantly a camp approved food.

Chocolate Zucchini Muffins 

makes 12 muffins 

1 1/4 cup whole wheat flour

1/4 c unsweetened dark cocoa powder**

1 1/4 tsp baking powder

3/4 tsp baking soda

1 tsp cinnamon

1 ripe banana, mashed

1/2 cup granulated sugar

1/2 cup unsweetened applesauce

1/2 cup almond or nondairy milk

1 zucchini, shredded and the excess water squeezed out

**I found this at the grocery store and I love it, you could use regular cocoa powder

Preheat the oven to 350F. Grease you muffin tin or spray with cooking spray. Combine the flour, cocoa, baking powder, baking soda and cinnamon together in a small bowl with a whisk. In a large bowl cream the apple sauce, banana and sugar. Then add in the zucchini. Add the dry ingredients a half cup at a time to the wet ingredients and stir until just combined… it should look like brownie batter. Spoon the mixture evenly into the prepared muffin tin. Bake for 20-25 minutes, a toothpick inserted in the center will come out clean when done.

Leave a comment

Filed under Breakfast, Dessert, Snacks

Szechuan Noodles and Peanut Butter Pie

Yesterday was Mark’s 22nd Birthday. We celebrated by having some friends over on Saturday night. We don’t really entertain much because we live 1 1/2 miles away from our campus, but everyone braved the blizzard and hiked over to enjoy some Naked Dove IPA.

On Sunday, Mark’s actual birthday, we had a peanut butter filled day. Mark had two requests: Szechuan noodles with spicy peanut sauce and peanut butter pie.

The noodles are adapted from Ina Garten and are really easy and tasty. Plus, if you don’t want to spend the extra money on soba noodles, you can just substitute whole wheat thin linguini. Also, pretty much any veggie can be thrown in and there will be plenty of leftovers.

Szechuan Noodles with Spicy Peanut Sauce

1/2 box of soba noodles or thin whole wheat linguini

2 tablespoon oil

1 small onion diced (or1/2 a medium onion)

10-15 baby carrots cut into rounds 1/4 in thick

1/2 red bell pepper, diced

5-10 mushrooms, sliced

1 cup of shredded cabbage

2 cup of broccoli florets, cooked, blanched or microwaved

3/4 cup of peas

dash red pepper flakes

black pepper

1/4 teaspoon ground ginger

1/4 reaspoon dried garlic

1/4 teaspoon cayenne

3/4 cup of peanutbutter

1/4 cup of siracha

1 teaspoon of hoisin

1/4 cup of soy sauce

1/4 cup of rice wine vinegar

1/4-1/2 cup of reserved pasta water

2 tablespoon of thinly sliced scallions (optional)

2 tablespoon peanuts, chopped (optional)

Bring water to a boil for the pasta. Heat oil in large skillet over medium heat, add onions and sautee for 2 minutes. Cook the broccoli with your preferred method. Add the carrots to the oil and onion, sautee for 2 minutes. Then add the bell pepper and sautee for 2 minutes. Once the water is boiling add the pasta and cook according to the box directions. Add the cabbage to the veggies and let wilt for 2 minutes. Then add in the cooked broccoli and frozen peas. In a medium size bowl, add the peanut butter, spices, siracha, soy sauce, rice vinegar, hoisin, and a ladle full (or 1/4 cup of pasta water. Mix to combine, if it seems a little thick add in another ladle of pasta water. Drain the pasta once it is done. Add the sauce to the veggies and top with pasta. Toss to coat and top with scallions and chopped peanuts (optional).

Peanut Butter Pie

1 prepared “oreo” cookie pie crust

3/4 cup of peanutbutter

3/4 cup of powdered sugar

8 oz of cream cheese, at room temp

1/2 pint of whipping cream

1/2 teaspoon of vanilla

3 oz of chocolate, plus one more for shaving as a garnish

1-2 tablespoon of milk

2 tablespoon of peanuts chopped

Combine the peanut butter, powdered sugar and cream cheese in a large bowl.

In another (largish) bowl whip the cream and vanilla until stiff peaks form. With a rubber spatula or wooden spoon gently fold the whipped cream into the peanut butter mixture, try not to let the air out of the whipped cream. I did it a few scoops at a time. Then spoon it into the prepared crust and even it out. Then shave some chocolate and sprinkle it over the top, you can use a vegetable peeler. Place the remaining chocolate in a heat proof bowl and place it on a small pot filled with an inch or 2 of water, over medium heat (a double boiler). Melt the chocolate, stirring it occasionally, once it is all melted add a little bit of milk, stir and see if the the chocolate drizzles off of the spoon in a thin ribbon. If it does not add more milk and try again. Once the right consistency is achieved drizzle it over the pie. Top with the chopped peanuts and cover and let it set up in the refrigerator for at least 4 hours. Then cut with a sharp knife and enjoy.

Leave a comment

Filed under Dessert, Dinner

Chocolate Covered Peanut Butter Balls

Now that the most difficult semester of my life is over… I can relax. Note to self, 3 lab classes, an intensive history class and having 2 jobs is not easy. I got a 3.8 for the semester… I ‘ll take that, considering how there was a point when I thought I might fail Chemistry. Other note to self, do not wait until senior year to take Chemistry. Not that I had a choice, I was in sunny Australia last time the class was offered and the time before that I had not yet discovered my love for Geology.

Speaking of which my life was soo much cooler this time last year. I spent the beginning of December visiting Mark in Prague. (Recap: I spent Junior Fall in Australia and Mark spent his in Prague, Czech Republic). Aside from freezing to death in the snow (hey I was coming straight from 80 degrees to 30 degrees) I probably had the best time I’ve ever had in my life. Nothing like 9763.3 miles and 3 months apart to make the heart grow fonder.

Anywho enough reminiscing about how much more interesting my life used to be… this recipe has jumped the line of recipes waiting to make their blog appearance:

1. Because they are so good. Chocolate and peanut butter… win! (I feel like my blog down plays my love for peanut butter; I eat about a jar a week)

2. My computer is visiting the computer hospital today… it struggled to make it through finals, crashing a few times a day. So now it’s in the hands of professionals, as are all of my blog pics. So I’m using the ones straight from my camera for this post and lucky, lucky… I made peanut butter balls last night

This recipe is an old family favorite:

I just follow the recipe, except I swapped out margarine for canola oil based butter. And I use a slotted spoon to scoop the balls out of the chocolate, to let the excess drain off before I placed them down on the wax paper. Also, don’t fret about the paraffin wax, it just makes the chocolate set up better and makes it more shiny and it is completely fine to eat (in small amounts, don’t go gnawing it right from the block)

Also check out last night’s dinner… mushrooms stuffed with kale, goats cheese, shallots and bread crumbs

2 Comments

Filed under Dessert

Quinoa Cakes with Eggplant “Ragu”

I had this weird realization today when I wrote the December rent check that we only have 6 months left in our apartment… seriously where has the time gone?  November flew by…  I was going through my camera and realized that I have about 10 different recipes waiting to be blogged. So this is going to be a double whammy, dinner and dessert…. Quinoa Cakes with an Eggplant “Ragu” and peanut butter cookies with Reese’s peanut butter cups.

But first, November in picture form:

For the Eggplant Ragu, I wanted to make something hearty and warm as the nights get darker and colder. I know it’s not a ragu in a traditional sense because it lacks meat but you could add meat if you wish.  I put the ragu over quinoa because it packs a serious protein punch and it chock full of amino acids, vitamin and minerals.

Quinoa Cakes with Eggplant Ragu

1 cup of quinoa

2 cups of water

1 egg

2 tablespoons Parmesan cheese

1 tablespoon of chives (optional)

2 tablespoons basil, sliced in thin strips

6 tablespoons of olive oil

1/2 large eggplant, cubed

1/2 onion diced

1 clove of garlic

3/4 cup of your favorite tomato sauce… I love Newman’s Own Tomato Basil

Bring the quinoa and water to a boil in a small pot over medium heat. Let it simmer for about 15 minutes or until the water is absorbed. Stir occasionally. One cooked, remove it from heat and let cool. While it is cooling, heat 2 tablespoons of olive oil in a large frying pan, add in onion and garlic, sauté 2 minutes, then add in eggplant and sauté for 5-8 minutes, or until the eggplant is cooked through. Turn down to low and add in sauce.

Heat 2 tablespoons of olive oil over medium heat in another large frying pan. Then add the cheese, egg, half the basil and chives to the cooled quinoa. Stir together. Form patty shaped cakes with the quinoa mixture and place them in the warm oil. You will probably have to do two batches. Cook about 3-4 minute on each side until golden brown.  Remove from the heat and plate. Once the sauce is warmed through, spoon over the quinoa cakes, top with remaining basil and a sprinkle of parmesan cheese.

The cookies were a late night creation. They are “healthy” in the sense that they don’t have white flour or butter in the cookie but crumbling up left over Reese’s might have tipped them back towards the not so healthy end of the spectrum… but hey we had to get rid of the Halloween candy somehow.

Peanut Butter Cookies with Reese’s Peanut Butter Cups

2 cups of unbleached whole wheat flour

1 teaspoon baking soda
dash salt (optional)
1 cup of crunchy peanut butter plus a little bit extra
1 cup maple syrup
scant 1/3 cup extra virgin olive oil

4-6 Reese’s peanut butter cups, crumbled up

Preheat the oven to 350 deg. Mix together baking soda, flour and salt in a small bowl. Warm the peanut butter until slightly melted (you can microwave or use the stove top… we only have a sketchy microwave that the previous people left so I used the stovetop.) Combine the peanut butter, maple syrup and olive oil. Stir in the dry ingredients until just combined. Then stir in the Reese’s. Let it sit for about 3-5 minutes so the baking soda can react. Then drop onto a greased or line baking sheet. Cross hatch with a fork if so desired. Bake for 10-11 minutes or until golden brown

1 Comment

Filed under Dessert, Dinner

Pumpkin Muffins

I have begun to notice a theme in my cooking this fall… an enormous amount of pumpkin (not that it’s a bad thing)

Pumpkin beer… Smuttynose and Sam Adam’s

Pumpkin Pancakes with the biggest container ever of Vermont Maple Syrup… and Mark for scale (also note Mark’s black eye from Rugby, he was very proud of it)

Cheese Tortellini with Creamy Pumpkin Sauce

Pumpkin Bars with White Chocolate Chips… see recipe here

Pumpkin Scones with Spiced Glaze… see recipe here

Pumpkin Pie

And Now… Pumpkin Muffins!

makes 12 muffins

2 cups whole wheat pastry flour or unbleached all purpose flour
1 tsp baking soda
1 ½ teaspoons of pumpkin pie spice
1/2 cup dark brown sugar
2 Tbsp maple syrup
2 Tbsp canola oil
2 large eggs, lightly whisked, or ½ cup of egg substitute
1 cup pumpkin puree
1 tsp pure vanilla extract
3/4 cup nonfat plain yogurt

¼ cup of powdered sugar

1 scant tablespoon of milk

First, spray a 12-muffin tin with nonstick spray and preheat the oven to 375. I usually advocate using muffin liners, but these are so moist that they stick to the muffin liners… so you end up losing a fair amount of your muffin or you have to gnaw it off the liner (which is ok too, I guess)

Mix the flour, baking soda, salt, and pumpkin pie spice together in a large bowl.

In a separate bowl, combine the eggs, syrup, oil, brown sugar, pumpkin, eggs, vanilla, and yogurt and mix until smooth.

Pour the wet ingredients into the dry and mix gently until just combined. If you over mix them, they become tough and chewy. Scoop the batter into the muffin tins, only filling them about 2/3 of the way up.

Bake for about 15-20 minutes, or until a toothpick inserted in the middle of the muffin comes out clean. Cool in the pans for 5 minutes before transferring them to a wire rack to cool completely.

While the muffins cool, in a small bowl mix together about ¼ cup of powdered sugar and a scant tablespoon of milk (I used almond) and a dash or two of pumpkin pie spice. Whisk until the lumps are gone. The mixture should fall from a spoon in a thin ribbon, adjust the amount of milk or sugar until this consistency is achieved. Drizzle the glaze mixture over the top of the cooled muffins and enjoy.

1 Comment

Filed under Breakfast, Dessert

Grilled Peaches

My last first day of classes as an undergrad was yesterday. I’m rather excited for 3 out my 4 classes. I’m taking 2 geology classes (Limnology and Sedimentary Structure) and a class about food systems in history. I also have to take intro to Chemistry for my Geo major… with 30 freshman (shoulda done that sooner). I’m coming to the sad realization that three 5 hour labs and 12 hours of work each week, along with heaps of homework and hockey practice is going to take some serious time management. Good thing I have running and cooking to help me keep my sanity. This recipe is short and simple… which is much needed after all of the higher level thinking I’ve been doing the past few days (making stacked histograms and statistically comparing dimensions of the world’s largest lakes nearly put my over the edge.)

I also need to squeeze this recipe in before peaches are completely out of season…

Grilled Peaches

peach, cut in half, pit removed

cooking spray

drizzle of honey

vanilla ice cream (optional)

Preheat grill to medium heat. Cut peach in half and remove pit, spray lightly with cooking spray. Place cut side down (skin side up) on the grill. Grill 5ish minutes until peach looses its firmness. Remove from grill, place grilled side up, drizzle with honey and if so inclined serve with a scoop of vanilla ice cream. I opted for no ice cream


I know… it’s so simple but delicious and healthy (sans the ice cream) and I got to use my grill!

Leave a comment

Filed under Dessert